The following article may be used free of charge with no prior authorization provided that it is used for nonprofit purposes and appears with the author biography at the end of this article intact. Please email us with any details of its use so that we can keep the author or other interested parties informed of the use of this article.
A PINPOINT
When Is It a Dot, When Is It a Pixel?
Gerry Stoner
| Overview of handling photographic files
|
Whether a picture is on paper or monitor, the picture itself is made up of discrete points. Obviously these points have to be so small that they become itty-bitty pinpoints of color or shades of gray in a smooth visual (you have seen this effect in television ads for digital cameras and Hewlett-Packard equipment).
Objective: To understand dots and pixels and be able to size and save the file in the correct format.
These small pinpoints are variously called dots (and dots per inch [dpi]) or pixels (and pixels per inch [ppi]). Both terms represent small discrete elements that together constitute a picture.
Evolution of the dot
A person laying out a newspaper in the last century placed the type and left holes for art that would then be sized and etched in place as a pattern of dots (the individual dots would be black; undotted areas would be white; and partially dotted areas would be gray). These early newspapers may have use 60 dots per linear inch.
The practice in printing art, therefore, has been to state the size and separately specify the resolution.
Evolution of the pixel
Computer monitors use extremely small lightbulbs (light-emitting diodes, or LEDs) to put color on the screen. Each LED generates a pixel of color, and the number of LEDs is part of the monitor the standard for most monitors is currently 96 pixels per inch.
To place electronic art, you specify the size of the art in pixels and the "resolution" of that art is automatically modified by the specification for the number of pixels.
The file size of an 8 x 10 photograph will be large because of its immense number of pinpoints (dots or pixels). If what is desired is only a wallet-sized picture or a small picture on the monitor, the sheer size of the entire file will slow the printing or display it is better to reduce the file size to one that suits the final use.
To size your picture for use on a computer monitor, use the pixel dimensions section, typically at the top of the Image Size window:
| A web designer defines the size of a picture in pixels, but monitors generally have around 96 pixels per inch. Thus, the final actual size showing on the monitor is determined by the designer's specs and the number of pixels per inch in the viewer's monitor. |
To size your picture for printing on paper, use the document size portion, typically in the middle of the Image Size window:
| To print the picture on paper (including photographic paper), the unstated standard is for 300 dots per inch and the designer will provide a spec for width in inches. Go to the Image Size window, check Constrain Proportions (keeping the ratio of height to width constant), BUT DO NOT check Resampling Image. |
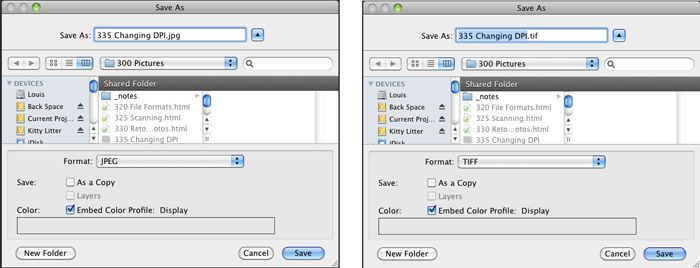
Saving the file to the correct format
Your last step with this file is to save it in the correct file format.
 |
 This article is one of several to help you document local history. Other articles will help you convert your interviews, documents, pictures, and artifacts into documentation of your local history that can be shared with your community.
Assignment: Most historical societies close down for the winter, and non-migratory neighbors tend to fight cabin fever by going to the Saturday or Sunday afternoon movies in Hunter, at the Power Authority, or another venue. While these may be fun, I hope you set up this alternative: host a series of workshops using this article as a focus and start to document your own local history.
.pdf file audio file
To use this article in your newsletter or as a handout, click into the article; select all; copy; and paste into a MSWord file.
Please remember to let us know of this use so that we can let the author or other interested parties know.
To subscribe or unsubscribe to this site, click here and select northerncatskillhistory (top left link).
Fill in your email address, name (optional), and a simple password.
You will receive an email confirming your intent
Respond to it to subscribe or unsubscribe to northerncatskillhistory.com
November 13, 2010
Copyright © 2009
northerncatskillshistory.com
contact northerncatskillshistory.com
![]()